I've never tried a trace monotype. I've seen them in action and have admired results, but for some reason haven't ventured forth. When I read it was a technique developed by
Paul Gauguin, I decided now was the time to try. My baseball guy seemed like a good project. It was meant as a study anyway, his current 5 x 7" being a little small, so why not try this technique which really seems perfect for it?
1. Research trace monotype. I typed it into Google and basically re-read all I already knew about trace monotype. Rostow and Jung (makers of the water-based ink I like) have a good description and a PDF with instructions
here, but if you're interested in this technique, there are a ton or resources and images that are worth investigating. I also flipped through several books that I own on printmaking. One all around must-have book is titled
The Complete Printmaker by Ross/Romano/Ross.

2. Create 4-color separations of my baseball guy at the larger size. On tracing paper I have the image separated into black, cyan, magenta, and yellow.
3. Set up shop. I have a large piece of plexi with a guide sheet taped underneath, then my 1/2 sheet of Rives BFK taped to the plexi on both sides, creating a hinge. I'm going to use my pinpress too, so I need a table at a good height for leverage, and our dinner table is perfect.
4. To be true to my mini encaustic, I wanted an amber color in the background. I used Akua Tack Thickener. I put about a 1/2 teaspoon in the middle of my plex and rolled it up with a brayer. Then I wiped the edges with a rag to create the outline of my print. Gently rolled by paper into place, then rolled it with my pinpress. Voila! (The
pinpress is aluminum roller off to the side.)

5. After cleaning any tack thickener from the plex, my next step was to roll up black. I have registration marks on the back of my Rives BFK as well as every color separation. Phew. I have thought this out. After flipping my paper onto the inked plex, I carefully tape my tissue paper with the black separation
in reverse onto the back of my Rives. I am using my pin press as a bridge. It straddles the plex nicely so I don't put any added pressure onto the paper in unwanted places. I use a ballpoint pen on the back of an additional sheet of tracing paper so not to mark up my color separation sheet. In areas where I want some tone, I rub my finger over the area. (The results are at a weird angle, but you get the drift.)
Steps 6, 7, 8. Repeat with Cyan, Magenta and Yellow.
I was planning on trimming my paper a bit after I was done printing, but I wasn't expecting a few blobs of red ink to land on my paper during the red stage. Oh well. I plan on adding a ball strike area with blue colored pencil after this puppy dries. I could have added with trace monotype, but I wanted a straight line and I thought using a ruler would add a bar of color vs. a line. All in all, I'm pleased! Print area is now 15.5 x 11.

 2. Create 4-color separations of my baseball guy at the larger size. On tracing paper I have the image separated into black, cyan, magenta, and yellow.
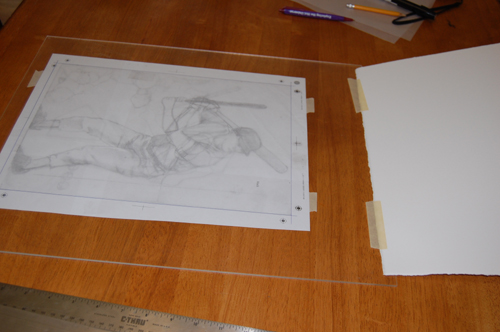


 5. After cleaning any tack thickener from the plex, my next step was to roll up black. I have registration marks on the back of my Rives BFK as well as every color separation. Phew. I have thought this out. After flipping my paper onto the inked plex, I carefully tape my tissue paper with the black separation in reverse onto the back of my Rives. I am using my pin press as a bridge. It straddles the plex nicely so I don't put any added pressure onto the paper in unwanted places. I use a ballpoint pen on the back of an additional sheet of tracing paper so not to mark up my color separation sheet. In areas where I want some tone, I rub my finger over the area. (The results are at a weird angle, but you get the drift.)


5 comments:
interesting! thanks for posting. It's a great piece too!
Trace monotype=magic every time!! Looks great!
I'm so-so on the black layer (Boy, a little pressure goes a long way!), but it was fun to try. I may try the guy as a drypoint and do the rest as trace monotype. Way to go Gauguin!
Cathy, Eileen McClellan showed me this last summer. She teaches middle school art and has student win national competitions with it. If I remember correctly, she had me take a sheet of tracing paper and rub over the initial layer of black ink to blot it off. She said it is usually too much ink at first. Might try this. It seemed to work well.
Oh that totally makes sense. I'll try that. Great idea!
Post a Comment