Showing posts with label crafts. Show all posts

Tuesday, November 4, 2014

Stamps! Speedy Cut Officially Rocks!

Wow. This stuff is excellent. I carved today, inked, and then even fixed my plate. Here's what went down:

Carved. (I eventually cut the birds out so they are separate hunks.)


Printed


Oh no! Mini accidental line incised right smack in middle of bird. How did that happen? OK, this stuff maybe shouldn't have been thrown in my backpack with all other kinds of crap. How did I fix? I gently rubbed it with my finger, and I removed enough of the eraser-like material down so that it wouldn't show when printed. See below.

All better


I know you're wondering, why is this bird green? I was lazy and the green was already out. On Friday I'll have a beautiful black+blue mixed up--to print a perfect male grackle!

Monday, November 3, 2014

I Have a Plan

E.A.S.T.--East Austin Studio Tour--is right around the corner. Yikes. I plan to be in my studio every day for the next two weeks trying to get ready. (Do put me on your list of studios to visit for Nov. 15-16 weekend, or Nov. 22-13.)

Step One: Map Out Space
I have to admit I stole this idea from my studio mate who has her space already mapped out.


Step Two: Determine What Needs to be Finished
Step Three: Get Things Done

Step One is done and I've kinda started on Step Two. But because of a really fun but ill-timed commitment, I need to get ready for an event on Friday before I can really kick some butt on my list.

Enter Speedy Cut--oh hell yes
So, I have an event this Friday and, well, I've been completely underwater of late with PrintAustin, so I haven't given it much thought until now. I need to come up with a hands-on activity that uses reclaimed materials and my art.


Voila! I'm going to whip out some stamps and use old textbooks and maps for folks to "Put a Bird On It." Here's more info on the Austin Creative Reuse's Raise the Roof event:
20 bucks for food, brews, wine, art, crafts, music, live entertainment, and more! You're coming to our Raise the Roof event on Friday, right? 7-11pm at South Austin Brewery!
You have seen these birds before, but they've been woodcuts that I've cut out and collaged onto maps and monotypes. That will really be impossible for a large group hands-on activity. Speedy Cut will be my savior and I can cut the birds out like rubber stamps after I carve them. Stay tuned--I'll be posting results.

Friday, January 3, 2014

Child Labor

Hey Friends. Sorry I've been ignoring this blog for awhile. I was slammed with a miserable cold and I'm just now feeling chipper enough to perform non-essential tasks. I hope you've managed to avoid this season's crud!

I had my kid whip up some cranes for me to send as thank you gifts to our recent studio subscribers. I had to pay Wes (11) $1 per crane, but it beats giving Wes money for presents for his paltry chore list (I need to change that for 2014). Here's a step by step on how to make your own. I'm thinking they will make great ornaments with a little pin prick and a piece of string. And one thing that's cool about cranes? I've heard their good luck!


Carolyn and I slipped the cranes into these gelatin cards we made awhile ago--maybe at the top of 2013? (If you haven't played with gelatin printmaking yet, you need to try it. FUN!)


Happy New Year! I'm really looking forward to 2014. Life keeps getting better and better, and I can't wait to see what's next. Be well, be safe, and happy printing!

Friday, December 20, 2013

The Bees are a Hit!

Received this from a happy subscriber! Carolyn and I had a good time pulling together our monthly offerings. Our first 6-month subscription has come to an end, but we're doing another for 2014! If you'd like to receive more info on our next art subscription, send an email to csavage at savageartist dot com and I'll be sure to send you our upcoming announcement. 

Monday, December 16, 2013

Shrinky Dinks--fun project that costs only pennies

A friend asked about Shrinky Dinks on a Facebook post today and I had fun remembering my last encounter with cooking plastic in my oven. See this post from a few years back for more info on how to do your own:


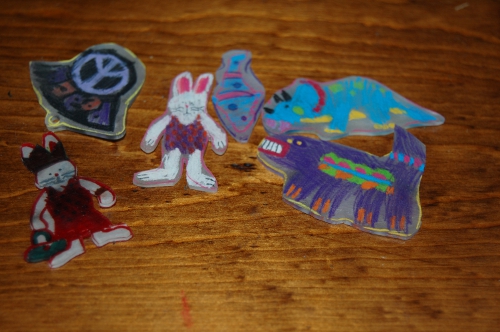
I spent so many weeks on The Tesla Project, that my brain has decided it's time for a vacation. And I have a feeling the next couple of weeks are going to be spent decompressing. Today? Shrinky Dinks, interspersed with naps and basic ennui. I used shrinky dink plastic that came with a craft book, but I happen to know you can use #6 plastic that to-go containers are usually made from. You will just need to sand one side of the plastic to give it some tooth. Use Sharpies and/or good quality (low wax) colored pencils and draw on the scratched up side. To cut the plastic, use very sharp scissors--little ones work the best. And don't fret over the plastic tearing a bit when you cut. Imperfections in the cutting can seem to disappear when baked. Then preheat over to 325 degrees, put prepared cut outs on a cookie sheet covered in waxed paper or tin foil, and bake 1-3 mins. Watch your creations. They will curl up and then uncurl. Wait 30 seconds after they uncurl and take them out. Voila! See? They shrink down quite a bit! Note: You must hole punch before baking.


Raleigh's creations... She just traced pictures in the craft book that we have, just as I traced the pic of Tesla from a little thing I had laying around.

Wednesday, November 27, 2013

Yes, my Dog wears a Coat

Look! I made this! Luckily I have an impressive stash of material including fleece from a project a few years back. Doesn't Io look adorable? I tell you what, I had a ton of stuff to do and I just ignored it and grabbed my sewing machine. It felt great to turn off the monitor and take a break from my to-do list and just sew.

I think she likes it. Raleigh said I should embroider the phrase,
"Don't I look fetching?" on the back.  :)
I admit I had a dog jacket that I laid on top and used as a pattern, just adding on some seam allowance. I did find some free patterns online and this looks very much like what I ended up doing.

Happy Thanksgiving! I'm thankful for so many things in my life, one of them being Cathy Savage fans. Thank you all so very, very much. Truly. I hope you have a great weekend with family and friends. I'll be back next week, but first, let me show you a pic of my latest Tesla:


Monday, October 14, 2013

Magic Foam

I spent some time on Saturday making fun stamps with a local outdoor group called Austin Families in Nature. I was inspired by this video.


Let me say that the results of the cheap foam I purchased in area craft stores aren't as dynamic as the product used in the video. The foam used for both is basic EVA--Ethylene-vinyl acetate--but the craft foam is a higher density and it doesn't "give" as easily. I used a heat gun on low for 15 seconds and was careful hold the gun about 5" from the foam and wiggle the nozzle in order not to scorch it. Since we were outside and I didn't get crazy with the gun, I didn't notice any fumes. Not one weird whiff. 

Here are our results with the cheap stuff. Perfect for a kid activity, and a stamp can be made on each side of the block. (These would be great for gelatin printmaking!) The round stamps were made using foam marshmallows (I kid you not, that's what they're called). 


Link for buying the good foam. I recommend the blue rectangles since they are thicker and easier to handle when stamping. 

Friday, August 23, 2013

Little Black Book

For years I've carried around a little notebook. I like jotting down ideas as they come along since my memory ain't what it used to be. For awhile I tried a digital notebook on my phone, but I never went back in to review them while the thoughts were still fresh, and in the end my shorthand notes became cryptic. This new moleskin is a little thicker than my regular purse notebooks, so of course I starting filling it in right away.


I've been wanting to do a print on King Henry VIII and while visiting my MIL, she said the funniest riddle that just needs to be memorialized in a linoleum block:

King Henry VIII to six wives he was wedded
One died, one survived
Two divorced, two beheaded

You never know, this could turn into something one of these days. 

Friday, August 9, 2013

Circles Galore

I bought this contraption to make circles. It's pretty cool. I can go from 1" to 5.5" circles. The nobby-like thing has a rotating blade in it and I just put the blade in the sized circle I'm wanting, hold the nob perpendicular to guide, and the guide thing swivels around giving me a nice cut circle. Who do I thank for this? Martha Stewart.


(Speaking of convicts, I just finished reading Orange is The New Black: My Year in a Women's Prison by Piper Kerman and I thought it was really good.)

Here's my finished Doodles in Math Class, the reason for taking the cutter out of it's packaging.

© 2013 Cathy Savage, Doodles in Math Class, collage and acrylic on panel, 22 x 30"
Yay! I wish I had a bottle of champagne in the fridge because finishing this thing is cause for celebration. It's been in my studio way past its expiration date. 

Thursday, May 23, 2013

Pretty Dang Clever

Hi there! My studio mate and I are putting out an art subscription. It's like a magazine subscription, except you get art delivered to your door. This was Carolyn's brainstorm, and a pretty clever one that at. Check it out.


Studio News:
Canopy Studio Subscription


Carolyn Kimball and Cathy Savage have teamed up! We've moved into our fabulous new studio together at the Canopy Art Complex--it's a big step, but one we're excited to take. Carolyn has had two successful years of offering an art subscription, and one way we're celebrating and supporting our new leap is to offer an exclusive collaborative art subscription to our fans and supporters.

What is an art subscription, you ask?

It's a unique art-by-mail offering from our new studio! Carolyn and Cathy will be collaborating on original artworks that will be mailed to your door--or sent as a gift to recipient of your choice--at below-market prices. Every month you'll receive something we've been working on in our studio. It could be a new print, screen printed tea towels, hand printed note cards, laser cut goodies, or something else fabulous we've dreamed up. At the top of the month, we'll send you a preview of what's on tap so you can redirect your item to a friend as a gift, order another one for a friend, or have us mount or frame your print for an additional cost.

We can offer you our work at below-market prices because you are buying it sight unseen. Once finished, these same works would sell for up to double or triple the monthly subscription price. Because your subscription helps to cover our overhead costs, we're able to pass along the savings. It's just $15 a month--or as the Kentucky girls says, the price of a good bourbon on the rocks (that's four lattes for the rest of us).

100% of the proceeds from our studio subscription will go to keeping the studio afloat.

You can join for 6 months and choose from one easy payment or monthly installments.

Yes! This sounds cool and I want to sign up!
6 months, one easy payment
6 months, monthly installments 

Thank you for your continued encouragement and support--whether it comes in the form of a subscription or an attagirl. :)

Carolyn + Cathy
Share
Tweet
Forward to Friend

40!

We need for 40 people to reach our goal! Please help us spread the word and share with your art loving friends.
Chicken tea towels from
Carolyn's spring line
One of Cathy's Grackle monoprints


I'm a Kentucky girl, a printmaker, painter, knitter, gardener and kitchen mess-maker. I create both fine art prints and modern home decor.

My fine art work centers on layered landscapes that evoke the history and memory of place- currently I'm working a series based on travels in the Middle East-and bold, graphic, woodcuts inspired by food. My home decor line, Kimball Prints, draws its inspiration from the beauty of the natural world.
In addition to my websiteand online store, you can find my work in the permanent collection of the Rochester Museum of Fine Arts and in private collections in the United States, England and Kuwait.

www.carolynkimball.com


One of Carolyn's fruit woodcuts


I dabble in a little of everything, but when it comes down to it, I am most passionate about printmaking. I'm interested in textures and layers and enjoy combining printmaking techniques to achieve end results. My favorite part of printmaking is creating the matrix--I love trying to figure out how the image in my mind's eye can be created in print. Collagraphs are my favorite technique. Once I get started building a plate, I have a hard time walking away from my studio for necessities like food and sleep. It's like putting together a puzzle--it's very hard to step away when the pieces just seem to be fitting!

My work is a reflection of my life and interests. I'm a mother of two and my experience as a parent is a common theme. I also have a thing for Central Texas' nastiest bird--the grackle, and they pop up everywhere. I've developed an affinity for mathematical and scientific subject matters as a by-product of my obsession with Nikola Tesla. One thing is for sure, my work is either a hand pulled print, or a collage using my hand pulled prints.

www.savageartist.com 


Cathy's laser-cut Tesla finger puppet


Monday, April 29, 2013

Promoting Minecraft

I can't believe it. I'm promoting Minecraft. My kids love it, but I do worry about my son who appears addicted. He gets screen time Fri-Sun, and he's been known to burst into tears if he loses 5 mins of time due to a scheduling conflict. He's 11.

Anyway, the t-shirt was for a fundraiser and I made a popular screen that pulled in massive donations (kids brought their own shirt, we screened it, all for 3 bucks) at Friday's Fine Arts Extravaganza at Gullett Elementary. We screened other shirts too, Hermione


and a Gullett Gecko. 


Making the screen


  1. Find a creeper online and size it to your screen. 
  2. Use the printout as a guide for your stencil. Tape or trace stencil on freezer paper, shiny side down and cut out. 
  3. Iron your stencil onto the screen. My Speedball screen wasn't square, so keep that in mind when ironing on your stencil, even if using a brand new screen. You'll want your design oriented to the part of your screen (in my case the top) that you're going to have clamped to your support when printing. I used a high setting with a cloth napkin between the iron and the screen, and let the iron sit for about a min before moving it to another part of the stencil.  This totally didn't work! It bleed under the freezer paper. I ended up using blue tape as my stencil instead of freezer paper. 
  4. Use screen filler and paint around the stencil. 
  5. Peel stencil off. Touch up where necessary. 
  6. Voila! Tape screen edges with masking tape on the flat side of the screen and it's ready to go.
For an authentic creeper, print black ink on green shirt.


Wednesday, April 24, 2013

Percolating

I've had some ideas percolating around, so I just signed up for a month of laser time at MAKEatx so I could work on them. I'm excited! I finally made it into the studio to work on my own crap yesterday, and boy did it feel good, especially because I've had my face in the computer screen for a few days now working on a graphic design project. Yawn.

Here's some stuff that went on last week before the design job started
I worked on a paper mache bird. It's painted now but you'll have to wait on that.


I proofed some wood and chip board scraps after they were laser cut, trying to figure out the best laser settings for an upcoming workshop.

intaglio (plate made of chip board)

relief (plate made of Baltic birch)

And yesterday I finally worked on my Io painting.


Wednesday, April 17, 2013

Horus and Anubis--that's what my son tells me anyway

(Deep inhale. Still so shaken over Boston.)

Super Amazing Mind-Numbing Stuff
I watched a NOVA episode about an ancient Greek artifact that is believed to be the first computer. Built by Archimedes. Whoa. Fascinating. I feel another print coming. Here's the link to NOVA if you want more info.

Horus and Anubis
While that's been brewing, I've been working on a small project for my kids' elementary school--a small billboard announcing the upcoming art show. I know you're thinking "WTH?! She keeps complaining about taking on too much!" 'Tis true, but this gives me great joy. I plan on giving my time to sources that serve me. If I'm (a.) truly advancing my profile/career in some way (b.) forging positive relationships and/or (c.) obtaining a level of joy that feels worthy of the effort put forth, it's an activity worth considering. I've noticed I keep doing stuff just because I've done it before without reevaluating if it would be a better fit for another individual. Or--because I'm excited to have been asked without really considering the question. How can I be 45 and still learning this crap?
Some detail shots of the heads.

The jackel reminds me of our old dog Banjo. He was a good boy.


Banjo was a lover, not a fighter. But he was nothing like our new dog Io, who is afraid of everything. This is how she looks even after the vacuum is put away.


Taxes are done. My slate is looking pretty good from this angle. I think I'll make a paper mache bird (pigeon? hawk? not sure yet). Guess what I'm using as the guts and body of the bird? You guessed it! My tax guide!

Friday, March 8, 2013

A Wee Little Fairy House

I've been hoarding a scrap of tree bark for 1.5 years. Yes, you read correctly. It's one that I brought home with me from North Carolina after I spotted it in the trash heap of artisan Preston Woodruff of Appalachian Tree Works. It has finally been made into something wonderful. Raleigh made a Fairy House out of it--with enough bark to share for 2 other houses--with her outdoor club, Austin Families in Nature.


Here's a closer pic, but I think it's an earlier version since the pine cone up top is missing.


Of course it was our center piece that evening! We plan on placing it en situ at Zilker Botanical Gardens on Saturday. It'll be tough parting with it, but it's too cool not to share with the public.

Sunday, February 24, 2013

First Day of Work

Finally doing stuff in the studio
I managed to work in the studio on Friday! My first day! I've had a back order on a Tesla puppet theater and with the holidays and then the move, I haven't had a chance to work on it until now. Speaking of the new studio, I'd love to have visitors. I hope to be in the studio regularly on Tu, Th and Fri, but you know how things can crop up, so shoot me an email first.

(BTW, the puppet theater is laser cut Baltic birch that I'm painting with acrylics. I talk about it here in this post if you want more info.)

I have somehow misplaced my battery on my SLR camera, with all kinds of great photos for future blog posts. Dang it! Hopefully it'll turn up soon. It's probably in a pocket somewhere... Until then I'll need to rely on my mobile device. Please bear with me, though I have to say my mobile takes a decent pic.

Monday, January 21, 2013

Monotype--so easy, so satisfying!

I'm teaching a workshop at Griffin School on Wednesdays this quarter, and this past Wednesday I covered reductive monotypes. I did a quick demo, of course, and here it is.


First things first: Have a beveled piece of plexi. I've marked the back of the plexi with Sharpie so I know where to wipe.


Clay dudes by artist Melanie Micale


I sketched something out based on one of these fun heads I bought in Brevard over the summer, by artist Melanie Micale, just so I wouldn't be at the front of the class with an empty noggin'.


Thief I, 10.5 x 16", monotype


I've created fun backgrounds spontaneously in the past, so there really isn't a reason to mark the back with Sharpie--you can just go for it. Here's and example of spontaneous.


Back to the head.
First I inked the entire plate in yellow, then took Q-tips and a paper towel to wipe away parts of the ink, then I ran it through the press. I used Akua intaglio inks on dry Arches 88. Then I wiped the plate clean, and reinked the plexi with a layer of red, wiped, attempted to register the plate and paper correctly, ran through the press... I finished up with a layer of blue and black using the same process.