Showing posts with label laser etch. Show all posts

Friday, June 7, 2013

Laser Workshop

I'm leading a laser cutting for matrix building workshop in conjunction with MAKEatx and their fabulous laser, the Patty Princess of Power.

Details:
at the WPA and MAKEatx studios, 1109 Shady Lane here in Austin
June 29, 2013, 1-6 PM, $75
Click here for more info. 

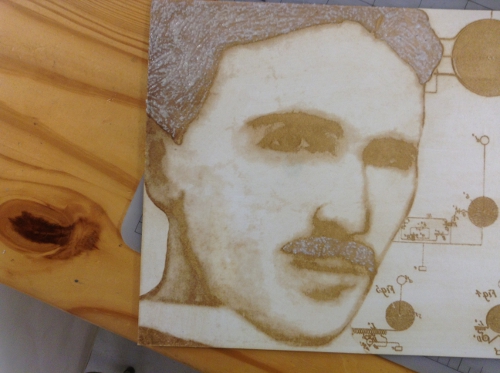
What can the laser do for printmaking? Well, it can take a line drawing and laser etch it into a piece of mat board like this intaglio matrix. (I'll need to coat the mat board in liquid medium before printing.)


It can cut out stencils, like these gears, which can be used with monoprinting or made into a collograph. These gears were cut out of poster board, and could be coated with liquid medium for longevity.


It can transfer your drawing to a piece of wood, cut fine details, which you can finish up with hand tools for a woodcut.


And last but not least, it can laser etch and cut out things like these Tesla finger puppets.


Thursday, May 23, 2013

Pretty Dang Clever

Hi there! My studio mate and I are putting out an art subscription. It's like a magazine subscription, except you get art delivered to your door. This was Carolyn's brainstorm, and a pretty clever one that at. Check it out.


Studio News:
Canopy Studio Subscription


Carolyn Kimball and Cathy Savage have teamed up! We've moved into our fabulous new studio together at the Canopy Art Complex--it's a big step, but one we're excited to take. Carolyn has had two successful years of offering an art subscription, and one way we're celebrating and supporting our new leap is to offer an exclusive collaborative art subscription to our fans and supporters.

What is an art subscription, you ask?

It's a unique art-by-mail offering from our new studio! Carolyn and Cathy will be collaborating on original artworks that will be mailed to your door--or sent as a gift to recipient of your choice--at below-market prices. Every month you'll receive something we've been working on in our studio. It could be a new print, screen printed tea towels, hand printed note cards, laser cut goodies, or something else fabulous we've dreamed up. At the top of the month, we'll send you a preview of what's on tap so you can redirect your item to a friend as a gift, order another one for a friend, or have us mount or frame your print for an additional cost.

We can offer you our work at below-market prices because you are buying it sight unseen. Once finished, these same works would sell for up to double or triple the monthly subscription price. Because your subscription helps to cover our overhead costs, we're able to pass along the savings. It's just $15 a month--or as the Kentucky girls says, the price of a good bourbon on the rocks (that's four lattes for the rest of us).

100% of the proceeds from our studio subscription will go to keeping the studio afloat.

You can join for 6 months and choose from one easy payment or monthly installments.

Yes! This sounds cool and I want to sign up!
6 months, one easy payment
6 months, monthly installments 

Thank you for your continued encouragement and support--whether it comes in the form of a subscription or an attagirl. :)

Carolyn + Cathy
Share
Tweet
Forward to Friend

40!

We need for 40 people to reach our goal! Please help us spread the word and share with your art loving friends.
Chicken tea towels from
Carolyn's spring line
One of Cathy's Grackle monoprints


I'm a Kentucky girl, a printmaker, painter, knitter, gardener and kitchen mess-maker. I create both fine art prints and modern home decor.
My fine art work centers on layered landscapes that evoke the history and memory of place- currently I'm working a series based on travels in the Middle East-and bold, graphic, woodcuts inspired by food. My home decor line, Kimball Prints, draws its inspiration from the beauty of the natural world.
In addition to my websiteand online store, you can find my work in the permanent collection of the Rochester Museum of Fine Arts and in private collections in the United States, England and Kuwait.

www.carolynkimball.com


One of Carolyn's fruit woodcuts


I dabble in a little of everything, but when it comes down to it, I am most passionate about printmaking. I'm interested in textures and layers and enjoy combining printmaking techniques to achieve end results. My favorite part of printmaking is creating the matrix--I love trying to figure out how the image in my mind's eye can be created in print. Collagraphs are my favorite technique. Once I get started building a plate, I have a hard time walking away from my studio for necessities like food and sleep. It's like putting together a puzzle--it's very hard to step away when the pieces just seem to be fitting!

My work is a reflection of my life and interests. I'm a mother of two and my experience as a parent is a common theme. I also have a thing for Central Texas' nastiest bird--the grackle, and they pop up everywhere. I've developed an affinity for mathematical and scientific subject matters as a by-product of my obsession with Nikola Tesla. One thing is for sure, my work is either a hand pulled print, or a collage using my hand pulled prints.

www.savageartist.com 


Cathy's laser-cut Tesla finger puppet


Monday, May 20, 2013

Laser Magic

I've been lasering some more light switches because I sold my 3 prototypes at the recent Open House. People love Tesla and I guess I shouldn't be surprised because he is awesome. Some guy came into MAKEatx while I was in there wanting to know if I was changing out all the light switches at my house since I was making so many. Now that's a good idea!


I've been wanting to make a print on the first computer, which experts have attributed to Archimedes. I watched a NOVA about it several weeks ago and blogged about it here, and while lasering yesterday I cut some gears for the print. I'm planning on making a collagraph at some point. I have so many things started and not finished and so I'm hoping to hold off on working any more on this print until I have a few other items crossed off my list. But seeing that laser cut out the littlest gear with teeny tiny little prongs made me so incredibly giddy that it's going to be hard to hold off. I needed to create the gears in Corel Draw, but once I had a little help from the MAKEatx people I was off to a good start. The little gear is between quarter and nickel size. It was amazing seeing the laser cut so precisely.

I have this recent Tesla matrix, which I reported on a week ago or so. I have coated the back of the mat board with 100% liquid medim/varnish and the front with 50:50 varnish:water. I added some gel with pumice to Tesla's hair and moustache so they don't wipe out. I need to coat the front again with another 50:50 solution before proofing, which will hopefully happen next week. So much to do, so little time.  

Tuesday, May 7, 2013

Open House this weekend!

I'm busy working, hoping to finish up some works in progress. I did finally send out my email campaign newsletter yesterday. Whew! It's exciting and a little unsettling. (How will it be perceived, did I have a typo, etc. Usual nerves...) If I somehow missed you, here's a snippet and you can view the full monty here. If you're not on my mailing list but want to be, enter your email address in the box on the right.


Lasering started today! 
I engraved another Tesla plate that only worked so-so the first time around. He's on mat board. Here's a proof using the old plate. Even though I could have fixed the lack of black in the mustache and eye area, the patent drawings didn't come through very well, so I'm hoping the second time is the charm. I will coat the plate with liquid gel medium and proof at some point. (The lasering happens at MAKEatx)


I made Tesla light switch plates today too, soon to be on Etsy--hopefully with a better picture. If you have to order 10 for your house right away, let me know and I'll get on that STAT. :)


What Was I Thinking?
I starting thinking about how this is May and at the beginning of the year I wanted to finish one piece per month. I finished one piece so far in 2013. Granted, I have several in the works, but I'm wondering if I can ever catch up. Needless to say, I have great plans for May.


Tuesday, December 11, 2012

Cut This, Glue That

© 2012 Cathy Savage, War of the Currents Puppet Theater,
laser engraved Baltic birch, 12 x 16"
I had some odds and ends to clear up today and it felt great to move stuff off of my workbench and onto a wall. I painted and glued this piece after cutting 1/4" rounds for a support frame, then adding oak trim as a finishing frame (see below).


The puppet theater is from a varied edition of 10 and it's pending approval from a collector that wanted one so it may be spoken for, but I have a few more in the queue should you want one. Etsy link here.


I had a studio visit yesterday and sold a grackle! I am loving this past week! If I can just sell one large piece at Hyde Park Bar & Grill where I have work up until mid-January, I just might make my 2012 financial goal. There is something to be said for setting goals. I chose an amount that was attainable providing stars were aligned, then forged ahead. I had a revenue setback (Haven Gallery relocated out of state) + the East Austin Studio Tour wasn't as profitable as I hoped, but there have been other streams: Etsy, Grackles sprinkled about in random shops, and studio visits that originated through nontraditional location exhibits (church gallery, library). I can't help but think that setting my goal at the top of the year helped me to keep reaching. 

Monday, December 10, 2012

For the Love of Epoxy

I love epoxy. Right now I'm favoring Gorilla Glue's 5 min Epoxy. I use it when gluing super magnets on to the back of my Tesla Finger Puppets and I just used it to attach hardware to the back of a piece because I thought a screw might do some damage.


Here's the piece. It was mounted on foam core at one point, so I needed to cut and spray paint a similar-sized piece of Baltic birch and glue the art (also a piece of Baltic birch) onto it with a heavy dose of wood glue. I like Titebond III glue for this part of the project. I lathered on a thick layer of glue and basically weighted the art to the background using big honking books until it set.


On the flipside of the background, I glued on a frame for support, made out of 1 x 1/4" pieces of oak trim. Now comes the epoxy part. I was concerned that the hardware screws were too long and might poke through the trim and the background and totally ruin my day. I decided to try epoxy. To keep a nice clean edge, I taped the area I wanted to avoid, applied the epoxy, then ripped off the tape before the epoxy set. Here's a before.


Here's after showing off my nice clean edges. Having work properly framed and looking finished is part of putting forth a good product, so with a little effort even the back can look good.


Now my piece is hanging at Hyde Park Bar & Grill in South Austin with 23 other Savage originals--it's up until January 12, 2013, btw. The epoxy was a perfect solution. I would have felt itty bitty screws insufficient for the project--besides, I really didn't feel like making a trip to the hardware store.

Tuesday, November 27, 2012

Finger Puppet for the Nerd in Your Life

Tesla Finger Puppets were my biggest sellers at the East Austin Studio Tour. The price was right ($5 for a basic puppet, $6.50 for one with a super magnet so it can hang out on your fridge) and Tesla is cool. If you're needing one for Your Nerd or ahem, Yourself, here's a link to my Etsy site.

Wednesday, November 21, 2012

Flower of Life

Long story short: I'm working on a commission piece with the lotus flower as an element. When googling "lotus" and "math," I found info on the Flower of Life and some of Leonardo's drawings, making my heart go pitter-patter.

From Wikipedia
The Flower of Life is the modern name given to a geometrical figure composed of multiple evenly-spaced, overlapping circles. They are arranged to form a flower-like pattern with a sixfold symmetry, similar to a hexagon. The center of each circle is on the circumference of six surrounding circles of the same diameter. It is considered by some to be a symbol of sacred geometry, said to contain ancient, spiritual value depicting the fundamental forms of space and time.

Mother Flower of Life with some babies
Making my own Flower of Life
I followed the pattern of the Flower of Life in Photoshop and then headed to the laser cutting machine. I created my own Baltic Birch version, along with some little babies. I inked and printed the large one without any breakage. The large one is surprisingly sturdy, btw. I placed the inked flower face up on the press bed, removed all blankets and instead used a piece of chip board. It printed beautifully, but you'll have to take my word for it because I forgot to take a pic of it.

I'm going to be with family for the next few days, and unless I happen upon something amazing, I'll be away from blogging. Have a wonderful Thanksgiving, and I'll be back en force in a few days!

Wednesday, October 17, 2012

Back to the Laser

© 2012 Cathy Savage, 11.5 x 15.5 x .75
Here I am gluing the final layers of the shadow box.
(Isaac Newton is peeking through on the paper underneath! See him?)
I joined MAKEatx for the month of October and I had my first laser session today. I have a show up at the First UU Church of Austin this month and this piece, which is an edition of 10 (incomplete, of course, as is my habit), is apparently in hot demand. I've had three expressions of interest since its been hung (!!), so I'm making more.


The laser cutting machine is pretty awesome. It took me eons to set up the file, but after that front-end work, I just need to be there while the machine does it's magic. Each puppet theater takes a little over 2 hours for the pieces.


I'll be painting each piece, assembling, then building a frame. Here are the pieces as raw Baltic birch.

I spent the rest of the day getting some grackles ready. I'm heading to Houston tomorrow and I have a location that might be interested in carrying them. Keep your fingers crossed for me!  

Wednesday, June 13, 2012

Attach This to That

I'm on a Make, Repair, Write and Toss kick this week.

Repair
Ring gluing, plus Raleigh's sock puppet
"Mazzy" needed some eye repair action
I heard about the website This to That from artist Beverly Mangham (I mentioned her assemblage workshops the other day in this post) and it's a site about recommended adhesives on various craft projects. We're big fans of epoxy in this house and I like the kind in a plunger where you open both the resin and hardener at the same time and squeeze out equal amounts. I fixed several things today including Raleigh's ring. I'm scratching my head as to why the people that made it in the first place, didn't score the metal and plastic a little bit before gluing the first time. That is gluing 101--give the surface a little bit of a tooth so the glue can hang on.

Make
© 2012 Cathy Savage,
Edison and Tesla Finger Puppets
The kids and I went to MAKEatx yesterday to do some engraving and while we were at it I made an Edison. It was a request from an Etsy buyer. She bought a Tesla too and I can only hope that Tesla will be considered the ultimate hero in her reenactment of the War of the Currents.


Write
© 2012 Cathy Savage, queen linocut on note card
Still writing one card per day! This is the last thing I do though, so it's not the easiest on the list. I'm using these cards that totally bombed on Etsy. Can't win them all.

Toss
I went through my shoes and put 2 pairs in the Goodwill bin. I love shoes but let's face it, I'm most comfortable in meemaw models and I might as well let go of the fantasy that I'll ever where anything else.


Sunday, June 10, 2012

Repair, Make, Write, Toss

Repair
Today I fixed this bug net.
Believe me, I was glad to see this big
thing leave my sewing nook.
This is going to be a week of action! We're at Camp Home this week and I told my 10-yr old it was high time he learned how to operate a sewing machine, so we're going to work on a project together. To get ready for this, I sized up my sewing nook which was pretty overloaded with crapola (give me a flat surface in this house and by George I'll fill it with crap). You know what? Cleaning my nook made me feel great! A still have a pile of stuff that needs repairing--patches sewn on, button replaced--so my goal is to repair one project per day for the next 5 days and get that stuff out of my nook forever.


Make
Birch Switch plate that now has
Tesla's System of Electric Lighting engraved on it,
courtesy of my Epilog Laser time
at MAKEatx this afternoon.
Why stop at repairing? It would be great to make something--or finish a stalled project--each day for the next 5 days. Sewing? Painting? Carving Erasures? Planting succulents? It can be anything, big or small. This camp-free week we're going to keep busy all week with crafts, mark my words!

Write
Same idea, but tackle one letter, email or phone call that has been put off. Today it was an overdue thank you note. I think the kids will enjoy writing notes/sending drawings to their grandparents and cousins this week. 

Toss
What's a productive week without removing a bit of clutter? One item per day... What'll it be? Cookbook? Skirt that no longer fits? Art supply? (Unlikely, but you never know.) Today I put 6 magazines in the pile to take to the library for the magazine exchange--yes, they were on top of my sewing table.

Saturday, June 9, 2012

Wood Putty Fixes Woodcut Error

I wanted to post the results of my wood putty fix the other day. You can barely see the section that I repaired.


Here's a pic of the plate.


© 2012 Cathy Savage, Tesla the Visual Thinker,
laser engraved woodcut, 15 1/2 x 10 1/4"

And here are my prints! This plate was created using the Epilog laser at MAKEatx. The image was from a 1-yr old linocut. I scanned a print (4 x 6), enlarged it, then engraved the image into a piece of shina plywood (McClains has the BEST wood. It printed perfectly opaque in areas where needed.), then inked up and printed as usual. I used Akua Intaglio Mars Black and Arches 88.

Friday, June 1, 2012

Laser engraved White Line Block

© 2012 Angela Hayes
The MAKEatx joint printing/laser engraving workshop last week was really fun--here's the last set of plates that I needed to show you. I don't know much about white line relief printing, but Angela Hayes laser etched a masonite block that was coated 2x with shellac (shown the bottom of the pic). She also laser etched a piece of chip board with the same design, which she coated 2x with 50:50 gel medium to water. I haven't seen a print from the white line block, but down below is an intaglio printed proof of Angela's chip board, printed with Akua intaglio ink with color added to the plate with a brush before printing. We had such a great response and would like to hold the workshop again. I'm working with the MAKEatx folks to figure out a good date and am shooting for August. If you're not on the WPA mailing list and would like to find out more info, please drop me a note at csavage @ savage artist (dot) com.

© 2012 Angela Hayes
I'm off to a ukulele festival in Dallas soon, and I plan on getting in all kinds of great playing and listening! I hope you're doing something equally inspiring this weekend!

Sunday, May 27, 2012

Laser Cutting Workshop for Printmaking, Day 2

We had a great time printing Friday night! Here are the results--though I'm missing a pic of a white line relief plate (Angela, send me pictures of your plate and print once you get a chance to test it and I'll put it up). MAKEatx is interested in holding this type of workshop again. I'm all for it, because even though I didn't work myself and wandered around answering questions, I learned a lot from what was produced and printed. Next time I'd love to experiment with melamine and acrylic. (All photos in this post by Debbie Buie.)

© 2012 Debbie Buie. This is a relief print on dry paper
using Akua intaglio ink. The chip board was laser "etched" 2x
and then sealed with acrylic medium.

© 2012 Deborah McLouth. Both of these intaglio prints were
laser "etched" into mat board and sealed with acrylic medium.
The fish was hit with the laser 2x and the flowers 1x.
We're leaning towards 1x as best for intaglio.

© 2012 Susan Randle. Susan laser "etched" Baltic Birch.
The beetle was printed as relief while the other print was treated like an engraving.

© Susan Randle. Here's a picture of Susan's plate.
It was hit with the laser 2x.

© 2012 Debbie Buie. This is Debbie's plate inked up and ready to go.
It is laser engraved Masonite that has been coated
2x with shellac. Unfortunately I don't have
a pic of a finished print to show you, but it came out beautifully.
Debbie printed on dry paper using Akua Intaglio ink. Since
there were no large white areas we only hit this relief plate
with the laser 1x, and it printed fine with no hand work needed.

Saturday, May 26, 2012

Fixing Cut Error on Woodcut

I made a cut error when making this matrix on the laser cutting machine. Luckily this wood putty works very well. It's called Quik Wood and it's a two part epoxy that you knead and then press into place. (I think I bought it from a McClains rep that was visiting Flatbed Press a few years ago, but you can pick it up at the hardware store. Speaking of McClains, I like their Shina plywood, which I'm using here.)


Here's the after. I've scraped out the overflow putty while it was curing and therefore soft. I plan to print it this week and will post a pic of this corner.


6 freshly gessoed wood panels

I'm on my way to 6 more Grackles and I have the beginning of that process documented here. I'm heading up to Dallas soon and I want to shop them around to a gallery I've been talking with. I hope to have a gallery here in Austin pick them up too. Once I have the details, I'll be sure to brag about it right here on this blog. :)