I talked all about how I made the plate for Tesla and the Birth of Radio, but not how I printed it. I thought that might be of interest for those of you unfamiliar with the intaglio method. If it is, keep on reading.
1. Tear paper
Traditionally printmaking paper is torn, not cut. An equipped studio has a tear bar, which is basically a heavy and beveled straight edge--a clean ruler can work in a pinch. Firmly hold tear bar where you want your paper torn and pull up a corner of the paper and carefully tear it, making sure the bar doesn't slip. The X that I've marked in pencil on the corner of the paper indicates the back of the sheet. Yep, most printmaking papers have a front and a back--the front has slightly more tooth on it to capture the ink. I'm using Rives BFK and it has a watermark, so the front is easy to figure out.

2. Set the press and make note of registration
I'm using a print guide and that makes registration easy. I've marked the centers on the short and long sides of the paper so I can easily plop it down when ready and reduce any shifting. You can't see the pencil registration marks I've put on the back of my paper, so I've circled them for you. I do this for all the paper in the edition at one time.

3. Soak the paper
Rives BFK and intaglio printing basically requires paper soaking for a nice transfer. Here's my paper in the soaking tray. I'll be soaking it for about 20 mins--about the length of time it'll take for me to ink the plate. After I take the paper out, I blot it and let it sit for about 5 mins to rest, then I'm ready to print. It's important that the paper doesn't have any kind of wet sheen to it. If it does, it needs to be blotted a bit more. Our studio has a rolling pin that can be rolled over the blotter/paper sandwich to try and squeeze out more water.

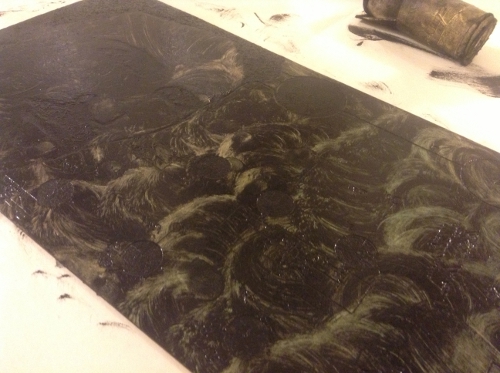
4. Ink plate with first color
I'm using Mars Black Akua Intaglio. I've had this ink for awhile. I don't remember it arriving from Akua so liquidy, but I'm using it anyway and not changing the viscosity with additives. I've mixed it and have dribbled it over my plate since it's the consistency of honey. I use a daubber for applying the ink to make sure the ink really goes into the deep grooves of the plate.

Here it is all inked up.

5. Wipe the plate
To wipe the black I'm using a "juicy" tarlatan. A tarlatan is like starched cheesecloth and "juicy" refers to the fact that it's wiped several plates and is a little caked with ink. A brand new tarlatan will wipe too well--besides, it seems to be one of the few tarlatans in the studio. Here's my plate post-wipe.

Now it's time to wipe with a sheet of telephone book paper. I carefully use the palm of my hand so the paper just hits the surface of the plate. I like using telephone book paper because it seems to really bring out textures. You can see how it's taken more ink off the surface. To get more ink off I could use a shop towel and wipe the face and eyeballs. I think I'll do that...

6. Roll on additional color
I've simply rolled my green-blue directly onto my inked plate (again, using Akua Intaglio but this time a 3-color mix). There are several different ways to add color, and I'm kinda throwing caution to the wind here since I will be corrupting my ink as I move along the edition. That's OK. I'm going for it. Heck, I'm just happy I'm editioning. I wipe the green-blue with telephone book paper.

7. Print
And admire!

8. Repeat
Repeat for as many prints that will go into the edition. In my case, it'll be 8 on the white paper. I plan on making another 8 someday in a buff colored paper.
1. Tear paper
Traditionally printmaking paper is torn, not cut. An equipped studio has a tear bar, which is basically a heavy and beveled straight edge--a clean ruler can work in a pinch. Firmly hold tear bar where you want your paper torn and pull up a corner of the paper and carefully tear it, making sure the bar doesn't slip. The X that I've marked in pencil on the corner of the paper indicates the back of the sheet. Yep, most printmaking papers have a front and a back--the front has slightly more tooth on it to capture the ink. I'm using Rives BFK and it has a watermark, so the front is easy to figure out.

2. Set the press and make note of registration
I'm using a print guide and that makes registration easy. I've marked the centers on the short and long sides of the paper so I can easily plop it down when ready and reduce any shifting. You can't see the pencil registration marks I've put on the back of my paper, so I've circled them for you. I do this for all the paper in the edition at one time.

3. Soak the paper
Rives BFK and intaglio printing basically requires paper soaking for a nice transfer. Here's my paper in the soaking tray. I'll be soaking it for about 20 mins--about the length of time it'll take for me to ink the plate. After I take the paper out, I blot it and let it sit for about 5 mins to rest, then I'm ready to print. It's important that the paper doesn't have any kind of wet sheen to it. If it does, it needs to be blotted a bit more. Our studio has a rolling pin that can be rolled over the blotter/paper sandwich to try and squeeze out more water.

4. Ink plate with first color
I'm using Mars Black Akua Intaglio. I've had this ink for awhile. I don't remember it arriving from Akua so liquidy, but I'm using it anyway and not changing the viscosity with additives. I've mixed it and have dribbled it over my plate since it's the consistency of honey. I use a daubber for applying the ink to make sure the ink really goes into the deep grooves of the plate.

Here it is all inked up.
5. Wipe the plate
To wipe the black I'm using a "juicy" tarlatan. A tarlatan is like starched cheesecloth and "juicy" refers to the fact that it's wiped several plates and is a little caked with ink. A brand new tarlatan will wipe too well--besides, it seems to be one of the few tarlatans in the studio. Here's my plate post-wipe.

Now it's time to wipe with a sheet of telephone book paper. I carefully use the palm of my hand so the paper just hits the surface of the plate. I like using telephone book paper because it seems to really bring out textures. You can see how it's taken more ink off the surface. To get more ink off I could use a shop towel and wipe the face and eyeballs. I think I'll do that...

6. Roll on additional color
I've simply rolled my green-blue directly onto my inked plate (again, using Akua Intaglio but this time a 3-color mix). There are several different ways to add color, and I'm kinda throwing caution to the wind here since I will be corrupting my ink as I move along the edition. That's OK. I'm going for it. Heck, I'm just happy I'm editioning. I wipe the green-blue with telephone book paper.

7. Print
And admire!

8. Repeat
Repeat for as many prints that will go into the edition. In my case, it'll be 8 on the white paper. I plan on making another 8 someday in a buff colored paper.
No comments:
Post a Comment