
Monday, April 30, 2012
Golden Acrylics
Saturday, April 28, 2012
Printing on MDF
 |
| Photoshop image of scanned flowers (The image will be inverted when printed) |
Students in my printmaking workshop drew images of flowers and after scanning them, I created a collage in Photoshop to laser cut into MDF. I treated the MDF before lasering with shellac (applied with a rag, let dry, lightly sanded with white 3M pad, reapplied shellac, resanded).
Digital techniques printmaking--here to stay
On the way to MAKEatx , our topic was Modern Printmaking Techniques Used Alone or when Combined with Traditional Printmaking--Are They Acceptable? Since they have been raised in high tech, I really wanted to get their opinions. When someone creates an image exclusively in Photoshop and calls it a Digital Woodcut, then prints it on a high-end laser printer, should it be called a woodcut? Here we were going to a laser cutting machine to digitally engrave a piece of wood. The consensus? Digital is here to stay. Artwork needs to be properly noted with technique. I also encouraged them to question artists and gallery owners how art works are created and printed, e.g. "art print" can actually mean "reproduction" and not "hand-pulled print"--not everyone is on the same page on full disclosure.

Wednesday, April 25, 2012
Printmaking Lesson Plans
 |
| Relief print--background made with skinny roulette |
Sunday, April 22, 2012
The Grackle Oven

I finished 6 grackles! I had the birds in the back of my car for several days in this self-made Grackle Oven so that the Akua ink would really, really dry. I love Akua, but the slow drying time can be a blessing (when art making) and a curse (when finishing--framing, storing, mounting, etc.). This is where the Texas sun comes in. I already trimmed the grackles with scissors (BTW I used Mars Black, which is their quickest drying black, on rice paper) with minimal ink transfer to my fingertips, but wanted to make sure they were totally nuked so I put them in this folder between 2 pieces of mat board--just to keep them from being damaged by my normal practice of hauling bikes.
 |
| © 2012 Cathy Savage, Grackles 3-8 |
Thursday, April 19, 2012
Fish prints--as in inking and printing the real fish!
 |
| © 1990 Deborah McLouth, Largemouth Bass, 9.5 x 22" |
My friend Deborah McLouth of Rippling Waters Studio creates the most remarkable fish prints. She's set up a trial run for her booth display (she's about to participate as a vendor in Babes on the Bay, a fishing tournament in Rockport, TX) and I went to check it out last weekend and bought the beauty above. It came with a copy of January 1990's Texas Parks & Wildlife Magazine, where Deborah was featured in a 5-page article demonstrating her techniques. Deborah is a member of Nature Printing Society, and I bought their book last year and recommend it. If your a printmaking book junkie, you need to add The Art of Printing from Nature to your collection. I have blogged about Deborah before after a studio visit and it included more pics. You can read that post here.
Deborah has led hands-on fish printing before and kids really love it. If you're looking for a printmaking project for young and old alike, this will work. There are molds out there of fish and other underwater creatures. Here's a link to molds available from Dick Blick.
Tuesday, April 17, 2012
Artist Date: Making earrings with lasers!
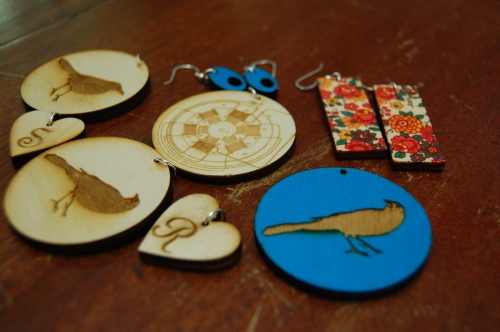 |
| The blue earrings are my friend Beth's design-- she made me a pair at the same time she was cut her own |

I am working on a screen print of Hermione for our elementary school's art show and it's coming along. I went online and found a lego pic of Hermione, copied it, increased the contrast, printed it out and then took a Sharpie to it. I have some touch ups to do, but I'm closing in on it. Next I'll be painting my screen with screen filler. We'll screen shirts that people bring to the art show for a $3 donation, so we're technically not selling a copy written image. (Yes, that's a wand! Doesn't it look like a walking stick?)
So. Tax time. I'm happy to say it's over. My husband does 90% of them, but it's tense around here at the final push. Hopefully I'll get some other great posts up soon. I went to a friend's home art show and sale over the weekend--fabulous--and then met a cool artist that I want to be sure to tell you about...
Sunday, April 15, 2012
Attempting to Reduce Production Time
 |
| I'm now printing 5 grackles at a time |
In order to make a living doing my art, I need to decrease my production time or use cheaper materials. Well, I don't like the cheaper materials idea, so I'm tackling production time. Working more efficiently on my sell able items will allow me to work on other projects--products that I'm excited about working on but have pushed back due to lack of time (these projects also have the potential to sell at a higher price point). In this vein, I carved 10 birds for my grackle collages on the same piece of wood--5 on one side, 5 on the other--allowing me to print several at a time.
 |
| Collaged boards waiting for grackles |
Revelation: Keep it Simple, Stupid!
I reduced time and effort by minimizing the amount of colors workshop participants could use. So easy to do and I don't think it diminished their experience (we were just proofing after all).
OK, I realize these simplifications aren't rocket science, but every little tip helps. If you have any of your own, I'd love to hear them!
Thursday, April 12, 2012
Sintra -- the Wonder Substrate
 |
| © Cathy Savage, Bird on a Ball, 22 x 30", drypoint and embossing on Sintra with collage and chine colle |
- It can be cut to size with a chop saw or table saw--or the old fashioned way with a utility knife and a ruler.
- It can be carved with a dremel tool, hand tools, scribe or something as simple as sandpaper.
- It can be coated with Pledge (formerly Future) Floor Wax to minimize the orange peel surface (handy for intaglio when wanting to reduce plate tone, plus making a smoother surface seems to make the tools glide easier).
- You don't have to bevel the plate when printing relief if using chip board or Naugahyde instead of blankets. (The pressure used is much lighter than intaglio where you'll need to bevel to keep paper and blankets from cutting.)
- It's cheap. An 1/8" width 4 x 8' sheet of it costs $22 from Regal Plastics. They will cut it for you into pieces for a few dollars.
- You can emboss it, make a collagraph, carve into it, sand it, and print it relief or intaglio.
- You can use the other side! It comes coated in plastic so be sure to peel off before you begin. (I leave the plastic on the back until I'm ready to go on the flip side.)
Tuesday, April 10, 2012
Workshop: Laser cutting for Printing
 |
| result from laser etched chipboard printed intaglio |
 |
| Laser woodcut matrix with some additional hand carving |
 |
| © 2012 Cathy Savage, Kepler/Brahe, 15 x 11.75" |
Here's my first woodcut on the laser machine. As noted in the caption above, I needed to do some hand carving in the areas that I wanted to be clear of incidental marks. The laser was great in getting my key imagery transferred to the wood. Since it was a digital file I could increase and decrease everything until it was just right, then go in with the hand tools.
More laser posts found using this link.
Monday, April 9, 2012
It was a Tesla kinda day
 |
| ©2011 Cathy Savage, Tesla the Visual Thinker, Linocut, 4 x 6" |

It may seem like I've been super productive, but I am feeling really scattered. I'm doing this crafty stuff (fun), teaching workshops (fun), and making the mini-grackles (also fun), but I'm taking time away from what I envision for my art. I just need to work it out in my noggin how I'm going to do these fun things that do generate a little bit of income, and how I'm going to do the stuff that is my true motivator--my other art projects. These things have been great but they've kept me away from focusing on my quest. If I manage to keep my work my main focus, and if I could see a line on how these fun things help spread the word of my other work, it might be worth it, but that's difficult to gauge. I'm sure I'll work it out eventually...
Saturday, April 7, 2012
Sintra, Cel Cut, PVC Coated Foam Core
 |
| © Cathy Savage, Country Roads, 11 x 15", mostly drypoint, some collagraph |
 |
| © Cathy Savage, Cowbird vs. Blue Jay, 11 x 15, drypoint, collagraph |
If you've tried Sintra for printmaking, I'd love to hear about how you've used it and if you have any tricks I need to know for relief.
PS We've had guests in town for the month of March, so I've been a bit sluggish with doing art and posting about it. But I'm back, baby!
Wednesday, April 4, 2012
Drypoint Tools
 |
| My favorite dypoint tools |
Tuesday, April 3, 2012
Cranking out Itty Bitties
|
 |
I also got a chance to meet on of my food heros! I went to a veggie fest over the weekend and met cookbook author Isa Chandra Moskowitz. She was signing books and so I picked up this new one. I own Vegan with a Vengence, Vegan Brunch, and Vegan Cupcakes Take over the World, so you could say I'm a fan. Her writing style is so funny, so right now this new cookbook can be found on my bedside table vs. my kitchen. I'm looking forward to trying some new recipes!
Monday, April 2, 2012
Hessian Soldier by artist Howard Rains
 |
| © 2000 Cathy Savage, Blue David © 2012 Howard Rains, Hessian Soldier |
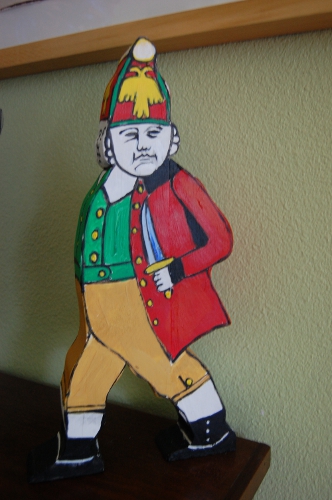 |
| © 2011 Howard Rains, Hessian Soldier,13.5 x 7 x 1.5" |
The artist is Howard Rains and he sells them on Etsy, so you can get your own should you be so inclined. What's a Hessian? Click here and you can go to Wikipedia.
I was fortunate enough to visit Howard Finster back when he was alive. Howard Rains' work reminds me of the other Howard's cutouts. Clever!!
Subscribe to:
Posts (Atom)